Posts

Showing posts from May, 2022

The hobby week - 21 May to 27 May

Image
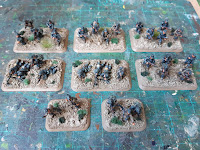
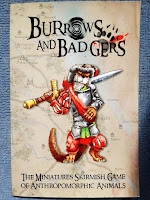
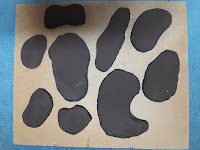
A successful week of hobby activity.  I'm taking The Yarkshire Gamer's advice and "not fcking about just getting it done". Gaming I played another game of Burrows and Badgers.  Read the AAR  here .  Painting/modelling   I finished the rocky scatter terrain pieces for use in Algeria and Mediterranean games.  To see more have a look here . I did a quick conversion job on an Old West shack for my B & B game.  I wanted it to look a bit more "oldy, worldy" so settled on a turf roof.  This was a bit of old brown flannel (washcloth) cut to slightly bigger than the roof to allow for a slight overhang.  I brushed Dulux grass green emulsion over this but was careful to allow some of the brown to still show through.  I added highlights using increasing  amounts of Dulux matched to Iraqui Sand to the green.  I didn't even stick it down as it balanced on the roof well enough (well for most of the game it did).  Rough and ready but did the job and gives me a multi

Payback? - A Burrows & Badgers AAR

Image
It might have taken six years since buying my first figures to have finally played a game, but here's another one a week later!   Setup Following on from the last engagement the two warbands, Werdna Thunderfoot's Royalists and Mellifluous Malachi's Wildbeasts once again cross swords (amongst other weapons). The Royalists.  L-R;  Nainama the Sparrow; Beriys the Adder Mage;  Lutralus River Blade the Otter (Second) Werdna Thunderfoot the Hare (Leader) Briar Far-sting the Rabbit Archer; Apodemus the Mouse Ranger  The Wildbeasts.  L-R McGranite the Ferret (Second) Salien the Toad Mage; Mellifluous Malachi the Fox (Leader) Putor the Ferret; Shakey Bart the Weasel Bitter Sydney the Shrew This game used scenario 2 from the rule book - Ambush the Camp.  The Royalists' Secondary Objectives was Defend, the Wildbeasts' Secondary Objectives was Isolate.  The Royalists (R) are the defenders, so the Wildbeasts (W) go first and get 3 moves before the Royalists activate as per the s

WW2 Italian campaign base makeover part 1

Image
Completing the hills and rocky scatter has now given me some terrain for my WW2 Italian Campaign project.  I've had a reasonable collection of 15mm Battlefront miniatures sitting about doing nothing for more years than I want to admit to.  There was no excuses now not to have a game, so it was time to get them out and take stock. My Axis force consists of: 1xGebirgsjäger platoon 1xFallschirmjäger platoon with additional command teams 1xFallschirmjäger 20mm Flak platoon 1xFallschirmjäger Mortar section 1x88mm Flak Platoon  2xSemovente 75/34 assault guns 2xHornisse tank destroyers I'd never really felt like I'd finished the bases, so I decided to bring them in-line with the terrain pieces.  I followed a simpler version of the colour scheme I used for the rock scatter terrain, with just a base coat of Dheneb Stone followed by a single drybrush of Iraqui Sand.  I finished them off by gluing on small pieces of different shades of homemade clump foliage as I did with the scatte

Rocky scatter terrain

Image
Around the same time that I started making the rocky hills I started fiddling about with some scatter pieces.  Very much inspired by an article on the excellent Steven's Balagan website I set to work. The first stage was to assemble the material.  I wanted the bases to be very thin but also strong.  I also wanted them to be irregularly shaped so precut MDF bases were automatically ruled out.  EVA foam was not going to be sturdy enough and I have noticed that this does have a tendency to curl up.  A delve through the bits bag produced a sheet of 1mm thick plastic card.  Perfect for the job.  Using just household scissors I cut out a whole load of irregular shapes for bases. I went through my tin of stones and selected some that I thought looked good.  When I placed them on the bases they looked a bit feeble.  A scout round the garden and flower pots produced some better ones as did a walk along the paths through our local woods.  I tried PVA and super glue to stick them to the bas

The hobby week - 14 May to 20 May

Image
I've had quite a busy week on the hobby front, doing things that should have been done ages ago! Gaming I played my first game of Burrows and Badgers.  Read the AAR here .   Painting/modelling   I finally managed to finish the rocky hills for Algeria/Mediterranean games.  You can see more of these here .  I've also been working on making some rock scatter terrain.  These aren't quite finished but are well on the way. Research & Reading I've been reading Fortress of Fury by Matthew Harfly.  It's the seventh of his Bernicia Chronicles series featuring the warrior Beobrand.  The novels are set in 7th Century Britain and are a great romp.  I'm not sure about the history of the books but they're an enjoyable and easy read and make the commute go quicker.  Incoming! No purchases this week.  I attended The Temple at War living history show on Sunday and took a wedge of cash but there was nothing to tempt me apart from food!  It was the first time the event has

A walk in the woods - Burrows & Badgers AAR

Image
Six years since buying my first figures I finally played a game of Burrows & Badgers.   Setup The two warbands pitted against each other were the Royalists led by the Hare Werdna Thunderfoot and the Wildbeasts led by the Fox Mellifluous Malachi.   The Royalists.  L-R Beriys the Adder Mage Lutralus River Blade the Otter (Second) Werdna Thunderfoot the Hare (Leader) Briar Far-sting the Rabbit Archer Apodemus the Mouse Ranger  The Wildbeasts.  L-R McGranite the Ferret (Second) Salien the Toad Mage Mellifluous Malachi the Fox (Leader) Putor the Ferret Shakey Bart the Weasel Bitter Sydney the Shrew I played the Open Battle scenario from the rule book.  The Royalists' Secondary Objectives were Deliver and Conserve.  The Wildbeasts' Secondary Objectives were Capture and Showdown.  The Royalists (R) win the Fortitude Roll-Off and are the Attackers.  The Wildbeasts (W) have the largest number of models and go first.  Each character is deployed in turn at their respective table edge.

Algerian/Mediterranean rocky hills

Image
Back in early March I started mucking about with some old polystyrene ceiling tiles and insulation blocks that I'd had in the loft for many years.  I wanted to create some rocky hills/escarpments that I could use both for the Italian theatre of World War 2 and also for my Algerian War project.  Any terrain I make has to have at least a dual purpose to make it worthwhile for the time and effort and also from a storage aspect, which both of these resources being limited.   The first batch were made from sticking together two polystyrene ceiling tiles with PVA which then had to be left to dry.  They were then stuck on thin cereal packet bases.   I didn't bother basing the batch made from the thicker blocks. All the basic shapes and then the detail were cut out with my old Games Workshop/Citadel hot wire cutter which has done me sterling service for nearly twenty years.  I try to avoid using knives as polystyrene is a pain to work with and using knives just makes it even messier a

The hobby week - 07 May to 13 May

Image
I've been quite busy with hobby stuff this week.  The week away has reenergised me with determination in getting on with things.  I  also published my 100th post - fittingly it was about terrain as I have done quite a lot of that since I started the blog.  Painting/modelling   I've made a couple of batches of woodland scatter terrain.  Quick and easy to knock up.  Have a look here and here .  I painted all the edges of my conifer tree bases in the Dulux green I had made up for me last year.  They now tone in more with my boards and mat. Burrows  & Badgers is my main focus at the moment and I have created two warbands. I also wrote a post about my intro to the game which you can see here . Research & Reading I've been studying the B&B rules and looking at videos online so I can actually play a game.   Incoming! I took a trip to the local Homebase to see my pal Gerry and get some more paints mixed up.  This time I took a swatch of Vallejo Leather Brown and Citadel

Burrows & Badgers

Image
As mentioned in the last weekly update, I started collecting Burrows & Badgers miniatures in 2016.  I was between projects at Salute with cash to spend and that's a dangerous combination.  The figures appealed to me straight away.  They combine two of my favourite things:  animals and wargames miniatures.  I spent a fair bit, so much that Jo Lovejoy (one half of Oathsworn Miniatures) gave me a free copy of the then current rule book.  As I started to paint the miniatures, I could really appreciate how well done they are.  I backed the 2017 kickstarter and probably painted my last one in 2018 by which time Osprey had released the rulebook.  The rulebook  is beautifully done.  There's a real charm about the game even though it's actually quite brutal and bloody. As is the norm I've been off an many a tangent in the subsequent years and it's only in the last few weeks  I've reacquainted myself with B&B.  The game and miniatures have become well established 

More woodland scatter terrain

Image
After completing the first batch of woodland scatter I very quickly knocked up another batch.   The steps are described in the earlier post, so I won't repeat them here.  The only change I made was to paint the whole of the base including the edges with the Leather Brown colour as soon as the sand was dried.  By taking a bit more care with the drybrushing, I didn't have to do this at the end like I did with the first batch. That's a total of eighteen pieces made over only the last 4 or 5 days.  These have been good to fit in whilst working as you need to allow time for the various stages to dry, so you can do a bit before work and it'll be ready for the next stage when you get home.  They're going to make my woodland games look much better.  

Woodland scatter terrain

Image
Taking a break from the Sikh Wars project I decided to make some scatter pieces to complement the tree bases I'd made last year. I spend a lot of time walking or running in mixed deciduous woodland and there's much more to a wood than trees.  Much of the greenery is from the understudy community of numerous plants and I wanted to simulate this.  As these pieces didn't need any strength I decided to make the bases out of EVA foam sheets.  It's more or less weightless, takes paint and scatter material well and can be cut with scissors.  Therefore it's quick to work with. I always paint the sheets with cheap craft acrylic paint to begin.  I think it gives a better starting surface. After cutting out the basic shapes and bevelling the edges with scissors, I covered each shape with PVA and added my usual sand mix.  They were left to dry overnight. Next stage was an undercoat of Dulux matt emulsion that I'd had mixed up to match Vallejo Leather Brown.  Once dry I appl