Posts

Showing posts from December, 2021

2022

Image
Happy New Year to everyone.  Here we are 2022.  If the last couple of years have shown us anything maybe making plans is daft but you need somewhere to start don't you? Prior to 2021 I always used to split the year into 3 sections of 4 months with Salute at the end of April as the key milestone to work towards.  The time before Salute used to be finishing off existing stuff.  Then I'd have a big splurge at Salute.  And the rest of the year would be wondering why I bought so much as I worked through it. 😆  There's no Salute in 2022 but I'm still going to plan the same.  Plans for first third 2022  Aspirations for existing projects Continue with 20mm Sikh Wars project  Complete EIC infantry regiment (remaining 24 outstanding figures) Add more units Focus on the following periods with special attention to terrain: WW2 Eastern Front 44-45 (1/76th) WW2 Yugoslavia 43-45 (1/76th) WW2 Italy 43-45 (15mm) First/French Indo-China War (20mm) 16th Century Western European Wars (15m
That was 2021 - end of year report

Image
It seems only moments since I wrote my half year report  at the end of June and here I am summarising 2021.  The Covid pandemic still impacts all aspects of life.  I returned to the work place briefly before the work from home instruction was issued again.  No complaints from me.  Let's see what transpires as we go through January.  Achievements 2nd half of the year Completed 99 figures - 64 20mm, 29 15mm and 6 28mm. Based all my medium deciduous trees. Based all my large conifer trees. Based all my palm trees. Made a load more scatter terrain for jungle games and spruced up my old jungle scatter terrain. Based all my small trees for 6mm on temporary bases. Made some hedges for 6mm games. Made some fields. Had a go at making a jungle terrain mat (still needs work). Made multi-figure movement bases for my 1/76th SHQ WW2 collection. Added magnets to the bases of all my 28mm WW2 collection. Researched a lot of potential new periods.  I've read about the Northern Crusades and the T

28mm farm animals

Image
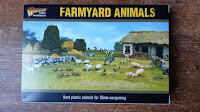
In November I bought a pack of Warlord Games Farm Animals.  I wasn't particularly impressed with them at the time so they just sat in their box.  Having had a bit more time over the last weeks I've revisited them. One of my particular gripes was that the moldings on the 2 piece animals didn't fit too well.  I got hold of some Vallejo Plastic Putty with a thin applicator nozzle and this sorted out the gaps.  You have to be very careful when cleaning up the mould lines as they are in the worst possible places such as down the pig's faces.   For basing I mounted the donkeys on some 50mm pill shaped bases from the Warlord Blitzkrieg Germans set, the pigs on 2 pence pieces, the piglets 2 to a 2 pence base and the geese and hens 2 to 1 pence pieces.   On their painting bases I added the sand mix to the bases before  painting.  I didn't agonise too much about colours being guided by the images returned from Internet searches for the different animals. I turned these round

1/76th Red Army platoon movement bases completed

Image
As with all things repetition allows for improvement.  After I'd completed the first batch of bases I'd already thought about how to speed up and improve the process. I am going to do a post of the complete process step by step. Here's a Red Army platoon all assembled on the latest batch of movement bases I've made.

Old West scatter terrain

Image
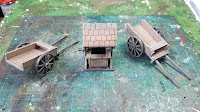
I finally got round to assembling and painting the wagons and well I bought in November. These were from Red Vector (Pendraken).  Although there wasn't any instructions included they were easy to assemble.  You'll need to be careful popping the pieces our the the frame so as not to break the longer parts but all you need is some PVA to glue them together.   I undercoated the well with cheap craft paint black and then used a mix of Citadel Dheneb Stone and Khemri Brown to paint the wooden parts.  I picked out the stones of the well with the above Citadel colours and with various Vallejo Model Colour and Army Painter earth, ochre and grey colours.  Careful painting preserves all the details scored into the MDF.  Once dry I applied a sepia wash over the stones with to age it and tone down the colours.  This gave a good muted appearance.  The final stage was to drybrush the edges of all the model with VMC Iraqui Sand.  I also used Citadel Dheneb Stone and Khemri Brown for the wagon

Movement bases for 1/76th WW2 figures - part 4 finishing off texturing the bases

Image
If you're interested in the thinking behind these bases and the previous stages please look here , here and here . For this final stage I wanted to add some texture to the edges of the 2p movement bases not only for aesthetic purposes, but also to provide a sort  of cup for the figures to sit in.  I mused about using household filler or Milliput/green stuff but felt I couldn't do this neatly enough.  In the end I opted to use sand. I'd already marked out the position for a  figure on each 2p.  I carefully brushed PVA onto the outer part of each coin and then dipped them in a pot of fine sand.  Using fine sand for this initial layer meant I could get a neat "doughnut" of sand on the coin.   I waited for these to harden and then added a layer of mixed sand.  Once this layer had set I added a further layer of mixed sand.  I could have gone on doing this if I'd wanted to sink the figures base further on the movement base but I quite liked how they looked at this s

Movement bases for 1/76th WW2 figures - part 3 making the bases

Image
The day after preparing the figures I grabbed a bag of 2ps to get on with making the movement bases.  The first job was to mark out where the figures were to go.  I got one of my least favourite figures, postioned him centrally on a 2p and drew round him.  And repeated another 50 or so times.  I did this so when I painted the 2ps I would ensure leaving a gap where the magnet would be. The next step was to form the movement bases.  Initially I went for three figure trays.  Ask any designer or gardener - things look best in threes.  I used a commercially bought 1p movement tray to get the general shape.  I did vary the angle of these as well as I didn't want them to be all the same.  The 2ps were initially joined by lengths of duct tape.  This is exceptionally strong and quite flexible but it's horrid to cut with scissors.  Once the bases were formed I cut away any excess tape with a sharp hobby knife.   This forms the basic shape but it's a bit wobbly.  I therefore cut some

Movement bases for 1/76th WW2 figures - part 2 initial figure preparation

Image
With all the coins checked and the magnets having finally arrived I could get on with the next phase which was to attach all the magnets to the underside of the figures. As mentioned in the introduction post , the figures were based on washers which are much more magnetic than the base of the figure and the magnets automatically snapped to them.  To resolve this I prepared a load of green stuff and added a blob to the bottom of each base.  I always find green stuff much easier to work with if you put it in your pocket for awhile before use to warm it up.  I also found a useful video on the best way to mix it  here .  This method worked well (the relevant bit of the video is from 20 seconds to 50 seconds). Germans in progress It was then a simple matter to pop the magnet into the centre of each blob and then press the figure down on a flat surface to even it out.   Partisans all green stuffed with nowhere to go To speed things up I found it better to separate out a load of magnets and s

Storage solution for 28mm WW2

Image
Like many people with hobbies I've got stuff all over the house.  My wargames collection spills across  two rooms and into the loft.  A dedicated games room is not on the agenda so I'm always looking at ways to tidy up and make the most of space. A few years ago I picked up a couple of Bisley metal filing cabinets from eBay at a very good price.  I managed to retain one and it's been very useful in consolidating a reasonable amount of my figure collection into the one place.   Most of the figures sit very well in the cabinet.  However, the plastic 28mm WW2 figures which are on MDF bases are so light they move every time I open or close the drawer and I'm continually rearranging them.  With my new found passion for magnets the solution was obvious.  To make the job easier on my old hands I even dug out my Dremel which has barely been used in the 20 years I've had it.  Armed with a 3mm drill bit it didn't take anytime at all to drill a recess into the bottom of th