Posts

Showing posts with the label Mediterranean

The hobby week - 18 June to 24 June

Image
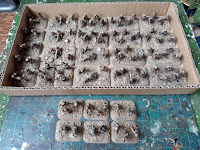
I managed to get a fair bit of hobby time in this week which included painting some figures.  It's the first ones I've painted since May and it was good to get back to it. Painting/modelling   I finally completed the exteriors of the Spanish/Italian buildings except for the water tower which is still as built.  You can see them here . I've been working on 20mm Sikh Wars artillery crews, for both the Sikh and Anglo-British forces.  They've been cleaned up, primed and painted with just the guns and basing to do.  Research & Reading I've been reading The First Anglo-Sikh War by Amarpal Singh.  This is a fine little book, in two defined sections.  The first part details each battle and the second part is a battlefield guide.  You may think that unless you're actually intending on going to visit the battlefields, that some of the second part isn't that useful, but there's still a lot of good info so don't just skip it all - as I almost did!...

Mediterranean MDF buildings revamp pt4 - finished exteriors

Image
After what seems like an age I finally completed the exteriors of the Empires at War Spanish/Italian MDF buildings.  This last stage was working on the wooden areas such as the balcony railings and doors.  Part 1 , part 2 and part 3 show the work up to this point. I can't really say that they're finished as there's the interiors to do and I also want to make some scenic bases for them.  But I've reached a stage where I'm happy with how they look and would use them in a game. Two Storey house(L).  Large house with balcony (R)                                                          Large three storey house with balcony (L).  Small three storey house (R) Arched building (L).  Taverna (R).  Two views of the church front (L) and rear (R).  Farm (L).  Villa (R). 

Mediterranean MDF buildings revamp pt3 - What a load of walls

Image
With the roofs done, the next stage in the revamp was to work on covering up the unsightly MDF where the corners of each wall joined which I'd talked about here . I grabbed the remnants of a Privateer Press P3 Jack Bone pot that I've had for years and liberally coated all the corners of each building.  P3 paints are very thick, like the old Citadel Foundation range and will cover anything in one coat. Mind the gaps When doing this I noticed quite a lot of gaps at the corners where I'd not assembled the buildings very well.  I decided to fill them, using  Vallejo Plastic Putty which has got a thin applicator nozzle allowing you to be quite precise.  I used an old gift card to force the putty in the  gaps then a rag to wipe it smooth.  With hindsight I should have done this before painting.  With this done it was time to paint the corners and try to blend them into the rest of the walls.  I used Vallejo Model Colour Dark Sand as the base colour and ...

The hobby week 04 June to 10 June

Image
A bit of a funny week.  With the double bank holiday I thought I'd get a lot done but after a good start with a game of Bolt Action and working on the Mediterranean buildings it tailed off somewhat.  Gaming I played a game of Bolt Action, set in Italy 1944.  Read the AAR here .   Painting/modelling   The rest of my hobby time has been spent working on the Mediterranean buildings.  You can read about this here and here .  Research & Reading I've started reading "Jungle of Snakes: A Century of Counterinsurgency Warfare from the Philippines to Iraq".  I picked this up in March for £5.59, £2.80 of which was the P & P.  I bought it for the section on The Algerian War but the entire book looks fascinating.  I was hooked just reading the Introduction and I'm now onto The Philippine Insurrection. Incoming! I've started June in the same frame of mind as May.  I'm fast becoming the wargames equivalent of Norbert Colon the Vi...

Mediterranean MDF buildings revamp pt2 - A spot of roofing

Image
As described in the first part of this series one of the main things to deal with was the roofs.  The pantiles were too dark, too plasticky and too shiny!  Luckily I had the perfect paint to hand in the form of Dulux Sumatran Melody 2, a tin of which I'd had mixed up earlier in the year when doing the bases for my Algerian War figures.   The original colours with one repainted roof First off I used a smallish brush to cut in round the edges of the roofs, trying not to get any paint on any other parts.  Then with a 1 cm decorating brush I covered all the tiled roofs.  One of the great things about using emulsions is they dry very quick.  All of the Dulux paints I've had made up have been made with a matt finish and they really do give a pleasing flat matt. This stage didn't take long to do at all. A pleasing matt basecoat The next task was to add some contrast.  I mixed up Sumatran Melody 2 with Dulux colour matched to Vallejo Iraqui Sand at appro...

Mediterranean MDF buildings revamp pt1 - Background

Image
As I mentioned in the weekly update for 28 May to 03 June I've made a start on the Spanish/Italian MDF buildings from  Empires at War .   I  bought the first set in 2017 intending to use them for the Italian Campaign in WW2.  I didn't get round to making them until 2019, and when I finally did I enjoyed it so bought the second set and made them soon after.  Empires at War offer sandstone or unpainted versions, I went for the sandstone to save some work.  Overall they went together well and they make nice little buildings.  I didn't do anything with them and they went into a box file waiting to be used. I always intended to make some bases for them, but it's only since I've rekindled my interest in the Italian Campaign that I got them out and had a good look.  Although these were bought as a finished option, there's still work that needs doing before I'd put them on the table.   First thought was to add a very light skim o...

The hobby week 28 May to 03 June

Image
I've been fully focused on my WW2 Italian Campaign project this week. Painting/modelling   I finished the bases makeover of the Allied part of my Italian Campaign collection which you can see here . I based my poplar trees.  These were the last trees that needed basing from the job lot I bought many years ago and based last year ( see The Great Tree Project posts ).  I used the same basic methods described in these posts, but with the colour palette I'd used for the Italian Campaign figure bases,  Algerian War figures and Mediterranean hills and scatter that I've been working on in 2022.  I've started improving my collection of 15mm Spanish buildings, which I'm using as generic Mediterranean buildings.  These are all Empires at War MDF that I built a few years ago.  Nice buildings overall, but there's always improvements you can make on MDF kits and that's what I'm going to be working on.  These will be my focus for a couple of week at least ...

The hobby week - 21 May to 27 May

Image
A successful week of hobby activity.  I'm taking The Yarkshire Gamer's advice and "not fcking about just getting it done". Gaming I played another game of Burrows and Badgers.  Read the AAR  here .  Painting/modelling   I finished the rocky scatter terrain pieces for use in Algeria and Mediterranean games.  To see more have a look here . I did a quick conversion job on an Old West shack for my B & B game.  I wanted it to look a bit more "oldy, worldy" so settled on a turf roof.  This was a bit of old brown flannel (washcloth) cut to slightly bigger than the roof to allow for a slight overhang.  I brushed Dulux grass green emulsion over this but was careful to allow some of the brown to still show through.  I added highlights using increasing  amounts of Dulux matched to Iraqui Sand to the green.  I didn't even stick it down as it balanced on the roof well enough (well for most of the game it did).  Rough and ready...

Rocky scatter terrain

Image
Around the same time that I started making the rocky hills I started fiddling about with some scatter pieces.  Very much inspired by an article on the excellent Steven's Balagan website I set to work. The first stage was to assemble the material.  I wanted the bases to be very thin but also strong.  I also wanted them to be irregularly shaped so precut MDF bases were automatically ruled out.  EVA foam was not going to be sturdy enough and I have noticed that this does have a tendency to curl up.  A delve through the bits bag produced a sheet of 1mm thick plastic card.  Perfect for the job.  Using just household scissors I cut out a whole load of irregular shapes for bases. I went through my tin of stones and selected some that I thought looked good.  When I placed them on the bases they looked a bit feeble.  A scout round the garden and flower pots produced some better ones as did a walk along the paths through our local woods.  I trie...

The hobby week - 14 May to 20 May

Image
I've had quite a busy week on the hobby front, doing things that should have been done ages ago! Gaming I played my first game of Burrows and Badgers.  Read the AAR here .   Painting/modelling   I finally managed to finish the rocky hills for Algeria/Mediterranean games.  You can see more of these here .  I've also been working on making some rock scatter terrain.  These aren't quite finished but are well on the way. Research & Reading I've been reading Fortress of Fury by Matthew Harfly.  It's the seventh of his Bernicia Chronicles series featuring the warrior Beobrand.  The novels are set in 7th Century Britain and are a great romp.  I'm not sure about the history of the books but they're an enjoyable and easy read and make the commute go quicker.  Incoming! No purchases this week.  I attended The Temple at War living history show on Sunday and took a wedge of cash but there was nothing to tempt me apart from food!...

Algerian/Mediterranean rocky hills

Image
Back in early March I started mucking about with some old polystyrene ceiling tiles and insulation blocks that I'd had in the loft for many years.  I wanted to create some rocky hills/escarpments that I could use both for the Italian theatre of World War 2 and also for my Algerian War project.  Any terrain I make has to have at least a dual purpose to make it worthwhile for the time and effort and also from a storage aspect, which both of these resources being limited.   The first batch were made from sticking together two polystyrene ceiling tiles with PVA which then had to be left to dry.  They were then stuck on thin cereal packet bases.   I didn't bother basing the batch made from the thicker blocks. All the basic shapes and then the detail were cut out with my old Games Workshop/Citadel hot wire cutter which has done me sterling service for nearly twenty years.  I try to avoid using knives as polystyrene is a pain to work with and using...