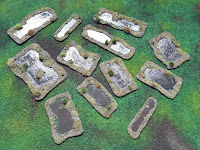
Swamp scatter terrain
After reading Death Zones by Simon Pasternak I started working on an Ambush Alley scenario set in Belarus during 1943. It soon became apparent that I needed terrain to better represent the swampy regions of the forests that cover the area.
I did some YouTube browsing and saw some impressive builds. However, I wanted something simple, that I could make from existing material. Automatically that ruled out using resin to represent water. As an alternative I did think of using a clear plastic to add some gloss but wasn't that convinced with how it would look.
The solution came when searching through my archived stash and I found some old gloss Humbrol acrylics. I bought these in the late 1980s to paint a leather jacket and incredibly they're still viable. I opened them all up and mixed a gloopy dark green colour in situ on the plastic card I was going to use. After leaving to dry I was pleased with how glossy it was and how well it reflected light.
I don't like terrain to be too regular. I think this is one of the worst things about bought terrain, it's too neat! I roughly marked out the shapes on the plastic and cut them out with a standard pair of scissors which took only moments to do. I then painted the credit card pieces with a cheap craft acrylic brown.
The next stage was to build up the edges of the pools and add some texture. My tub of filler had finally run out and I mulled over whether to use some green stuff. However, in keeping with the quick and cheap ethos, I used tile adhesive/grout left over from some DIY. This took only about 15 minutes to do. Once again I wasn't neat, it's a swamp after all.
Grout dries really quickly so I was able to paint a coat of Dulux deep matt emulsion I'd had colour matched to Vallejo Leather Brown on that same evening. I could have skipped this and painted it all once I'd added the sand, but sometimes you get the white of the filler showing through. I didn't have the time to add the sand that evening so settled for painting it. Stupidly I forgot to take photos of these two stages but they'd not be that exciting!
Awhile back I'd decanted some horticultural sharp sand into a container from a 5kg bag that I'd got, but it was still damp when I checked it. I opened it up and left it in the sun all day while I was at work and when I got home it was dry enough to sieve out the bigger bits and work with. I brushed lightly watered down PVA onto the textured bits of the bases and dipped them in the sand. That was all I could do that day and I left them to dry overnight.
The next morning I brushed all the bases to get rid of any loose sand. Then I painted the sand covered areas with the Dulux matt emulsion /Vallejo Leather Brown I had used above. This gives a good dark basecoat to build up from and seals all the sand in.
Within a very short time the basecoat was dry and I could do a dry brush of Dulux emulsion colour matched to Citadel Foundation Khemri Brown. This was followed swiftly by a further drybrush of a Dulux grassy green colour that I'd had mixed up a couple of years ago. The basic painting was now complete.
It was now time to get in the water. As mentioned already I'd decided to use gloss acrylics for this. Using blue and yellow I mixed a green as the starting point. I then added a dark brown and covered the water part of the piece. From this base colour I mixed in tan and black to add contrast and depth. I used a stipple technique and mixed it in-situ until I was happy with the effect. I repeated this for each one. As a final touch I added a tiny bit of white for a few highlights. Once this was dry I gave all of the water areas a thick coat of Vallejo Gloss Varnish which I really "glooped" on.
With all the painting done it was time to add the foliage. I started off by reversing what I normally do and added the mixed size and colour self adhesive grass tufts first. I wanted these to blend in more with the surrounding vegetation as I added it. I then blobbed on some PVA and added patches of flock. When this had dried I added an equal parts mix of 2mm summer/autumn static grass with a pinch of spring grass. It was then time to add small pieces of different colours of my home made clump foliage. Finally I went back and added some more flock on the water to represent weeds and a bit more static grass. I finished up with a quick drybrush of Army Painter Banshee Brown across any areas of bare earth.
I let all the foliage dry overnight. First thing next morning I used an old brush to blob on a 50/50 mix of PVA and water to all the foliage to try and seal it.
And that's the job done. I'm happy with how they've turned out. Not allowing for drying time for the various materials actual build time was probably no more than 2 or 3 hours. They virtually cost nothing to build as I used materials I already had. I was pleased to get some use out of the old gloss acrylics. In the photos below you can see how the light catches on the gloss painted and varnished areas of the water which is exactly what I wanted. Now I need to use them in that game.


Very nice!
ReplyDeleteThanks Ray.
ReplyDelete