Warlords of Goria - A Warlords of Eherwon/Celtos AAR
Introduction
I've been wanting to try out Warlords of Erehwon with my Celtos figures for awhile now. I played a test game in September and last week got the opportunity to play a full game using the same forces, Sidhe and Gaels. I used the Army Lists for Barbarians and Elves in the Warlords of Erehwon rule book and the points values document from Rick Priestley's website and it was easy to transpose these to represent the Gael and Sidhe troop types from the Celtos rules. I didn't do much to take into account the nuances of hte Celtos rulebook so the points values were probably off and I'll probably redo these at some stage. To even up the points (around 800 for each side), I took a unit of Gael Berserkers (who appear in the Celtos Gael army book not in the core rules). To represent the Gael Staff Sling I made it a one shot sling for missile purposes and a spear for hand to hand combat. I used the spells from Warlords of Erehwon rather than try to convert the Celtos ones, although this is something I may do in future. The scenario is Scenario 1, Upon the Field of Battle form the Erehwon rule book.
 |
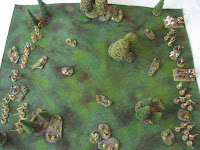
| Starting positions |
Turn 1
The first turn mainly consists of both sides moving up their forces. The Gael Horsemen are hampered by the terrain and other troops so only advance a short distance. The Sidhe Hero Advances, moving forward and then shooting at the Gael Spearmen. He hits one who fails their resist roll and is killed, with the unit also taking a pin. This proves to be a forerunner for the rest of the game for the Spearmen. The Sidhe Archers Fire on the Gael Hero in his chariot, hitting twice, with one of them causing 4 Pins and with the hero having to go Down when rolling on the chariot damage table. The Gael Berserkers Run but fail their Agility roll for moving into rough terrain so only move half their allotted distance. End of turn.
 |
| Positions at the end of Turn 1 |
Turn 2
The turn begins with the Gael Hero passing a recovery test, removing a Pin and returning his dice to the bag. There’s more manoeuvring of the forces. The Sidhe Sorcerer casts Fiery Balls at the Horsemen scoring 2 hits, they resist but still take 2 pins. The Gael Spearmen fail their Order test but remove the pin and go Down. The Sidhe Hero picks off one of the hapless Horsemen. The Gael Hero passes his Order test, removing a pin and charges the Sidhe Guards scoring 3 hits of which 2 cause casualties. The Sidhe Guards respond by hitting 5 times but the chariot absorbs it all using the Tough rule for one re-roll. The Guards pass the Break test for losing the combat and the Gael Hero decides to follow on hitting twice more but causing no further casualties. The Sidhe Guards also score 2 hits with no result.
 |
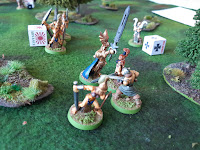
| The Gael Hero charges |
The two sides now move apart to consolidate after all that violence. The Gael Staff slingers Fire at the Sidhe Greatswords, inflicting 2 casualties and adding 1 pin. The Gael Berserkers fail their Agility test again but at least get into open ground. The Sidhe Archers fire at the Gael Hero hitting 6 times but only one is effective and it is very effective, causing the crew member to be incapacitated, adding 4 pins and forcing the chariot to go Down. Seeing how things are developing the Gael Chieftain charges the Sidhe Lord. The Sidhe Lord’s spangly armour saves him but 1 bodyguard is killed. The Lord strikes back with his improbably huge sword causing 4 pins and a Down action on the Chieftain. Both sides consolidate. End of turn.
 |
| Positions at the end of turn 2 |
Turn 3
The turn starts with the recovery tests for those units with a Down action. Both the Gael chariots fail but remove a pin each and the Gael spearmen pass. The action hots up with the Sidhe Retainers charging the Gael Chieftain and causing another 2 pins on the Gael Chieftain. His response is to despatch a Sidhe Retainer adding a pin to that unit. As the Chieftain has lost the combat and takes an additional 4 pins which means the total number of pins is equal to his Command stat so he’s destroyed and removed from play.
 |
| The Gael Chieftain's valiant end |
The Gael Berserkers charge the Sidhe Greatswords who respond by inflicting 2 casualties but are wiped out. The Gael Horsemen pass an Order test and charge the Sidhe Retainers, causing 2 casualties and pins but in response lose a Horseman. The lone Gael Horseman fails the break test and the additional 6 Pins destroys the unit, which is removed from the table. The Sidhe Lord fails the order test takes a Down action but removes a Pin. The Gael Druid successfully casts enfeeble Foe at Retainers. The Sidhe Guards charge the Gael Berserkers causing 3 casualties and pins. The Berserkers strike back for 2 casualties and pins but lose the Break test and are Routed.
 |
| Berserkers in action! |
The Sidhe Archers add yet another pin on the Gael Hero in chariot. The Sidhe Sorcerer Advances and cast Fiery Balls on the Gal Hero, hitting twice and causing 4 more pins. Continuing as he started off, the Sidhe Hero Advances and kills another Gael Spearman. They charge their tormentor but although hitting twice fail to damage him and his response is to miss 3 times. He presses the attack killing one with no response. The Gael Spearmen pass the break test and consolidate. The Gael Staff Slingers inflict 2 casualties on the Sidhe Guards who fail the break test due to losing half their number from missile fire and take 2 more pins. I realised at this point that I should have removed the Gael Hero, as by this stage I was using 3 D6 to record that he had 14 pins on him! End of turn 3.
 |
| Positions at the end of turn 3 |
Turn 4
Continuing his lone Elf vendetta the Sidhe Hero again shoots at the Gael Spearmen for 1 pin. The Sidhe Retainers charge the Druid, hitting twice but he shrugs it off. His attacks miss, and both sides consolidate. The Sidhe Guard fail their order test but remove a pin. The Gael Druid makes a Rally action removing 4 pins from the Sidhe Berserkers who pass the Command roll and stop routing. The Gael Spearmen fail their Command roll, lose a pin and go Down so can't activate this turn. It now becomes a slaughter as the merciless Sidhe mop up the Gael force. The Sidhe Lord charges the Gael Berserkers killing the remaining two although his last bodyguard is killed in the melee.
 |
| My what a large weapon! |
The Sidhe Archers kill the last 2 Gael Spearmen. The Sidhe Sorcerer kills a Staff Slinger with Fiery Balls and inflicts 2 pins. The Staff Slingers fail their order test take a pin and go Down. End of Turn.
 |
| Position at the end of Turn 4 |
Turn 5
 |
| The end of the Gaels |
The remaining Sidhe Guard fails Recovery test but removes a pin. The Sidhe Hero Advances fires at the Gael Druid but misses. The Gael Druid stands alone, pinned between the advancing Sidhe Lord and the Sidhe Retainers. In preparation for the inevitable melee, he chooses to cast Enfeeble Foe on the Sidhe Lord. However, the Sidhe Retainers charge and hit him twice. He uses Tough to slough one but is wounded. He misses with his response and loses the combat. The Retainers follow on and it’s all soon all over. The Druid is slain. The Sidhe Sorcerer casts Fiery Balls killing 3 Staff Slingers, who break taking 6 more pins and are destroyed. The Sidhe are completely triumphant.
 |
| Watch out!!! Fiery balls heading our way... |
Summary
What an enjoyable game that was. It was great to get some of the Celtos collection on the table for the first time in too many years. As you'll know from my previous ramblings, I love the Celtos setting and figure range, but was less keen on the rules. This was partly due to the terrible design decision to use an unreadable tiny size font in a light coloured script! What were they thinking? In my opinion Warlords of Eherwon is a more robust system and it works very well for what I wanted.
As a solo player I prefer games with random activation (such as Donnybrook) and WoE gives this. For WoE (and Bolt Action) I modify this by numbering the activation dice which corresponds to each unit and activate that unit as the dice is drawn. This helps to add some spontaneity to the game as I can't plan ahead too much for either side or unit and just have to play to the event as a warlord of a small force would have to.
There was a few rules I missed but overall I've got a reasonable grasp of them now. I'm already planning another game this time using my Fir Bolg and Formorians. They'd work very well for Ancient through to Medieval historical games as well.


Always nice to see Celtos miniatures on the table, and yours are very nice indeed, looks like it was a fun game.
ReplyDeleteThanks very much Donnie, kind of you to say so. I hope to play a Fir Bolg vs Formorians game soon and do an AAR for that.
Delete